What Is BLS Training And Why Is It Important?
November 21, 2022Cardiopulmonary resuscitation (CPR) is a basic lifesaving technique taught in the BLS certification and training course and is used to restore blood circulation and breathing in a person who has suffered a cardiac arrest. Cardiac arrest is a sudden loss of heart function, breathing, and consciousness when the heart's electrical activity becomes abnormal, and is the situation where CPR becomes crucial.
CPR is challenging, and you may feel more anxious if you serve it for the first time. However, quick and appropriate actions help the person's life and also assist you in becoming more confident after the crisis ends.
Anyone can learn CPR, and people need to be trained in CPR techniques to help save a life in the event of a cardiac arrest. CPR performed by a trained rescuer can effectively assess the situation. Still, you can perform CPR if you are untrained, all you have to know is the method. And this blog is all about the methods of performing high-quality CPR.
"Becoming CPR certified is critical for being able to help those in need, especially when an emergency occurs. I train all of my employees so that they are fully CPR certified."
- Dr. Kitts, Soundview Family Dental
Types of CPR
The two main types of CPR are: hands-only and conventional, have important differences in technique, recommended use cases, and training required. Understanding these distinctions allows one to take appropriate action avoiding the other secondary risks of breaking ribs.
Hands-only CPR: It involves calling in a trusted source for help and pushing on the chest with a rapid motion. This movement is known as chest compression. Hands-only CPR helps us prevent delays in blood moving through the body (important organs).
Traditional CPR with breaths: The method involves alternating chest compressions with mouth-to-mouth breaths. This kind of CPR will help you to give more oxygen in the critical moments before the medical team arrives.
When to Perform CPR?
Performing basic CPR steps is quite hectic; more than that, determining if somebody needs CPR is more important. CPR is live saving if someone serves it correctly. Many people need to learn when or how to do CPR. Below are the signs that a victim shows if they need CPR:
- The person suddenly collapses and becomes unconscious.
- The Victims have a problem breathing.
- Heart stops beating
- You don't find pulse
Key Determinants of Survival of CPR
Survival from cardiac arrest is a complex issue that hinges on various factors. Timing plays a crucial role, with survival rates significantly affected by how quickly defibrillation and return of spontaneous circulation (ROSC) are achieved. Consideration of the initial rhythm, particularly in cases of asystole or agonal rhythms, can also be indicative of survivability. Age, interestingly, is not an independent predictor of survival.
Survival from cardiac arrest is contingent on many variables, all of which must be meticulously considered. From the exact timing of interventions to the underlying medical conditions and directives, understanding these determinants is vital for medical professionals. Thorough consideration of these aspects informs appropriate decisions and actions, optimizing the chances of survival while respecting individual wishes and clinical guidelines.
Key Questions and Considerations
Several vital questions and considerations must be addressed to determine the approach to resuscitation, such as:
- Whether the arrest was observed
- The initial rhythm detected
- The cause of the arrest (cardiac or non-cardiac)
- Timing aspects including time to CPR, defibrillation, and ROSC
A more nuanced approach might also examine circumstances related to the arrest, prehospital measures, and in-hospital response.
Circumstances of Arrest
Details surrounding the arrest can shape the resuscitation approach and prognosis. Factors such as the premorbid medical state, any advanced directives, time details related to the arrest, whether it was witnessed or unwitnessed, and the rhythm on ambulance arrival are all pivotal.
Important Factors Before Performing CPR
As a CPR Training School, we, more than anyone, understand the importance of being able to administer CPR in emergencies. Nobody wants to be put in a situation where they may have to save a life, but unfortunately, it happens daily. One of the most common actions you must take is emergency CPR. It's a scary thought, but if you learn the proper technique, you will have the confidence and ability to save a life in the unfortunate event that you are tasked with doing so.
The below points are the factors to be administered well during emergency situations like cardiac arrest or drowning:
Scene Evaluation
The first step of CPR is to evaluate the place you are performing CPR is safe. Quickly survey the surrounding area to ensure that everything is safe. Tap the person's shoulder and loudly shout, "Are you Okay?"
Dial 911 and Ask For Help
If you are the only helper available, dial 911 immediately. If there are others around, make intense eye contact with the first person you see and direct them to dial 911. This is likely to make them feel more obligated to help. Direct another person to get an Automated External Defibrillator (AED) if it is available, get ready for the shock delivery after the AED has complete its analysis and commands to shock. Remember to clear the victim completely before and while the AED is analyzing the victim. Start the pre-CPR process if there are no other bystanders or if there is no AED available.
Clear the Victim's Airway
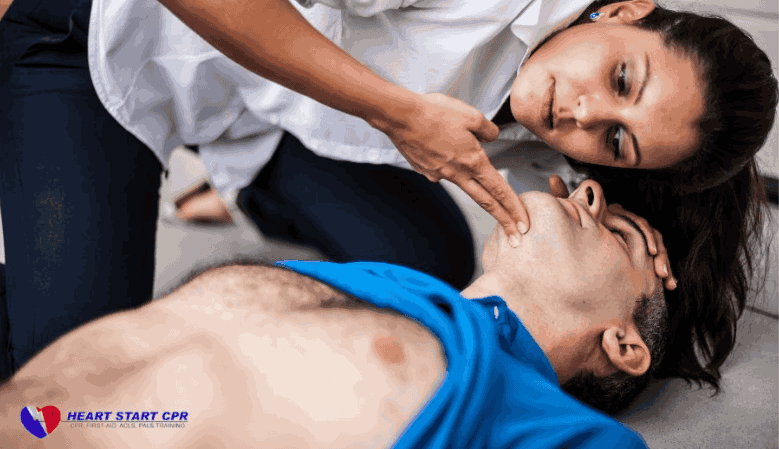
If you are someone with cardiopulmonary resuscitation (CPR) training, you must open the person's airway using the head-tilt, chin-lift maneuver. To open the airway, first, ensure the person is on his or her back. After this, gently grab the head and tilt it back slightly so the chin is lifted away from the chest. Here are the steps to follow:
- Lay the victim flat on a firm surface
- Position the victim on their back
- Straighten the legs
- Place the arms alongside the body
- Align the head using the head-tilt, chin-lift maneuver (if no spinal injury is suspected)
- Remove any obvious obstructions in the mouth if safe to do so

Monitor the Breathing
Put your ear near the person's mouth and nose. For 10 seconds, listen for breathing. If you don't hear any noise or only occasional gasps for air, it is time to begin emergency CPR. Breathing is an important vital sign to monitor a person's heart health before administering CPR.
Chest Compressions
Chest compression is a physical job that requires strength and power. While performing chest compressions you may feel fatigue and due to the reason changing position with a second bystander rescuer is effective.
Why is CPR fatiguing?
Once you are in the correct position, pushing down on the person's chest, aiming for 2-inch compressions is required. Extra force is added by using your body weight when performing the chest compressions. It’s a hard and fast performance, intending to give 100-120 compressions in 60 seconds. Remember that there are separate CPR techniques for infants, children and adults which we have discussed below.
Must-Read: How Can You Achieve a High Chest Compression Fraction?

Rescue Breaths
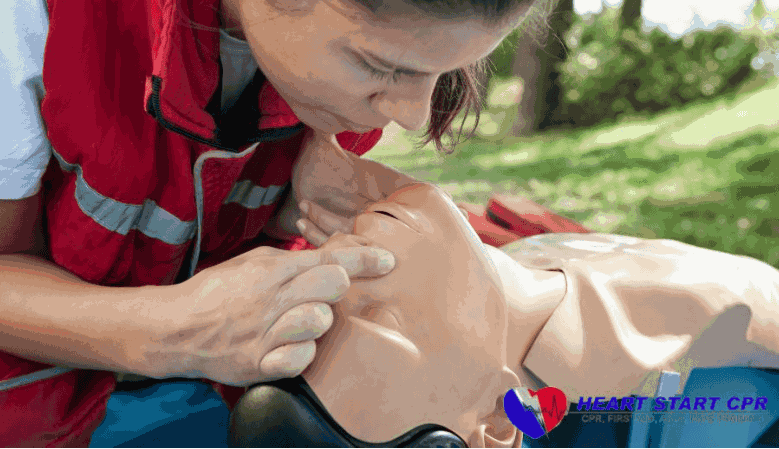
After a minute of chest compression, lift the chin, tilt the head backward, and pinch the nose with your thumb and forefinger so it is shut. Form a seal over the person's mouth with your mouth and blow firmly. The goal is to make the chest rise from the air you will blow into the victim’s mouth. Administer two rescue breaths and then start chest compressions.
If you cannot make the chest rise with your breath, tilt the head again and give another rescue breath. The goal is to ensure the proper posture of the victim to reduce "brain fog" and to administer CPR as efficiently as possible. If the chest still isn't rising, the victim may be choking, and you need to perform first aid for choking. Perform 30 chest compressions and look into the person's mouth for an object. If you see something, remove it.
Must-Read: What is the Indication for Mouth-To-Mouth Rescue Breaths?
Continuous CPR Cycle
Keep performing the cycle of chest compressions and rescue breaths until the person starts breathing on his/her own or until an EMS or doctor enters the scene. Switch with another rescuer to avoid fatigue, allowing a minimal gap between the switch. The maximum time interval for pausing chest compression is no more than 10 seconds, but keeping the gap as short as possible can make a difference between life and death.
If an Automated External Defibrillator (AED) becomes available, follow the steps to perform resuscitation.
Components Of High Quality CPR
Following CPR guidelines optimizes blood flow and oxygen delivery to vital organs. While the failure to adhere to proper technique reduces survival rates from cardiac arrest. High-quality CPR is crucial for positive patient outcomes. The 5 critical components of high-quality CPR are:
- Chest compressions at a rate of 100-120 per minute with a depth of 2-2.4 inches, allowing full chest recoil after each compression.
- Minimal interruptions - stopping compressions impacts perfusion.
- Avoid excessive ventilation - only give rescue breaths when needed.
- Rotate CPR providers every 2 minutes to avoid fatigue.
- Use feedback devices like metronomes if available.
- Adhering to guidelines optimizes blood flow and oxygen to vital organs.
How to Perform CPR?
As a CPR Training School, we, more than anyone, understand the importance of being able to administer CPR in emergencies. Nobody wants to be put in a situation where they may have to save a life, but unfortunately, it happens daily. One of the most common actions you must take is emergency CPR. It's a scary thought, but if you learn the proper technique, you will have the confidence and ability to save a life in the unfortunate event that you are tasked with doing so.
“If you are untrained personnel, provide uninterrupted hands-only CPR at the rate of 100-120 chest compression per minute. Until emergency medical help arrives. You can change rescuers to avoid fatigue and continuous CPR.”
- American Heart Association
How to Perform CPR on an Adult?
While giving CPR on an adult, make sure of these things to deliver high-quality CPR:
- Lay victim on a firm and flat surface
- Chest compression rate 100-120 per minute
- Chest compression depth of at least 2-2.5 inches using your body strength
- Allowing full chest recoil after each compression
- 2:30 ventilation ratio. Maintaining 2 rescue breaths after each 30 compressions
- Chest Compression Fraction (CCF) should be at least 80%, meaning you should deliver compression greater than 80% while performing CPR on adults.
- Ensure each breath rises the chest and should last for a second
- Air-tight seal while giving a rescue breath
- Continued compression until emergency medical service arrives
Correct hand position for adult CPR:
When giving chest compressions to an adult during cardiopulmonary resuscitation (CPR), it's crucial to ensure the correct hand position for effective and safe chest compressions. Begin by locating the lower half of the breastbone, or sternum, and place the heel of one hand on its center. This is the starting point for the compressions.
Next, interlock your fingers, using your other hand to interlace with the hand on the chest. It's important to keep your fingers off the chest to prevent putting pressure on the ribs, ensuring that the force is directed to the sternum. Position yourself correctly by aligning your shoulders directly above your hands, and straighten your elbows. This alignment allows for effective use of your body weight in compressing the chest rather than relying solely on arm strength.
How to Perform CPR on Child (1-8 Years Old)
Because of the demographic and physical difference, performing CPR on a child requires special concern and techniques. While giving CPR on a child between 1 to 8 years, make sure of these things to deliver high-quality CPR on a child:
- Lay child on a firm and flat surface
- Head tilted back. Make sure head is not tilted back too far
- The heel of one hand on the center of the chest - breastbone, just below the nipples.
- Chest compression rate 100-120 per minute
- Chest compression depth should be ⅓ the depth of the chest, approximately 1.5 inches depth.
- 2 gentle breaths after every 30 compressions. Each breath should be 1 inch long.
- Ensure each breath raises the chest
- Chest compression fraction >80%
- Allow complete chest recoil after each compression
- Continuous compression until emergency medical service arrives
Correct hand position for child CPR:
For child CPR, the correct hand position is to place the heel of one hand in the center of the child's chest, just below the nipples. Place your other hand directly on top of the first hand. Keep your elbows straight and shoulders directly over your hands.
How to Perform CPR on a Baby (Below 1 year)
While delivering CPR on a baby (less than a year), make sure of these things to deliver high-quality CPR:
- Lay baby on a firm and flat surface
- Tilt head back, do not tilt the head too far
- Use two-finger technique
- 100-120 compression per minute
- Chest compression depth should be 1.5 inches
- 2 gentle breaths after 30 compressions.
- Ensure breathe rises chest
- Allow complete chest recoil after each compression
- Continuous compression until help arrives
Correct hand position for baby CPR:
For infant CPR, the correct hand position is to place two fingers on the breastbone just below the nipple line. Use the heel of your other hand to provide back support to the infant's head. Keep your elbows straight and shoulders directly over your hands.
How to Perform CPR on Pregnant Woman
Pregnancy is a deliberate situations is While performing CPR on a pregnant woman, make sure of these things to deliver high-quality CPR:
- Position the victim in the supine position
- Two hands for chest compression
- Pulse check every 30 seconds
- Press hard and fast at the rate of 100-120 per minute
- Chest compression of 2 inches deep
- 2 rescue breaths after 30 chest compressions
- Allow the chest to come back to its initial position after each compression
- Continue chest compression until Automated External Defibrillator (AED) or help arrives
Correct hand position for CPR on a pregnant woman:
Hands are positioned and placed just as CPR for any other adult which is over the half of the sternum.
Learn about Does CPR Break Ribs
When Should You Stop Administering CPR?
The condition of the patients will decide when to stop performing CPR. If the patient shows signs of life, starts to breathe normally, or coughs, you must stop performing CPR. The situations where you may need to stop CPR are:
- If the person starts to breathe independently, CPR is no longer necessary.
- If the person has a pulse and is breathing, you should stop CPR. You can check your pulse by feeling on the side of the neck or by using a pulse oximeter.
- If the person's heart starts beating again and they start breathing on their own, you should stop CPR.
- If a medical professional determines the person has died, you should stop basic CPR steps.
Learn more in detail about when to stop CPR.
It is important to note that CPR should continue even if the rescuer is tired. It would help if you continued CPR until the person is revived or until a medical professional takes over.
CPR Certifications at Heart Start CPR
According to a Kirkland dentist, knowing how to administer CPR in an emergency could mean the difference between life and death and is one of the most critical skill sets one can have. If you are interested in improving your knowledge of CPR with some CPR training, feel free to check out any of our San Francisco CPR classes.
FAQs
The presence of an advanced airway like an endotracheal tube or supraglottic airway device bypasses the patient's upper airway structures and allows air to be delivered directly into the trachea and lungs. This removes the need to pause compressions to give rescue breaths. It also helps ensure unobstructed ventilation without gastric inflation.
However, CPR quality remains crucial - chest compressions must be performed at adequate rate and depth with full chest recoil. Ventilations should be given asynchronously at 8-10 breaths per minute without interrupting compressions. Compressions generate higher intrathoracic pressures which can reduce venous return, so continuously assessing hemodynamics and perfusion is important.
Overall, an advanced airway optimizes oxygenation and ventilation but high-quality compressions are still key during CPR. The focus shifts from coordinating compressions and ventilations to monitoring CPR quality and physiologic response.
- When victim is breathing normally
- Obvious sign of death
- If environment is hazardous or dangerous
- On medical professionals decision
- An AED is available
The recommended compression rate is still around 100-120 compressions per minute. Ventilations are provided by delivering breaths through the advanced airway device at a rate of 1 breath every 6-8 seconds.
This approach ensures consistent chest compressions while maintaining adequate ventilation during CPR.
- High quality chest compression
- minimize interruption
- team coordination
- regular training and practice
- rotate compressors as of fatigue whenever needed

